0
$\begingroup$

When I began taking spectra of samples, I was lucky to have a spectrometer that basically did everything for me and produced spectra of samples that I would expect from literature.

I am now using an "ordinary" UV-Vis spectrometer and I am looking for some advice on the proper process I should follow. The instructions in the device manual don't go into details about any follow up to the measurements.

As an example, I am measuring a flat, polished, opaque surface.

I use an aluminium mirror as a baseline measurement. I have the reference data from the manufacturer, (R_Al_Ref)

As a test I measure the aluminium mirror as a sample, which produces a flat ~100 % Reflectance curve with some noise. (R_Al_meas).

So the actual reflectance curve of Aluminium is R_Al_true = R_Al_meas * R_Al_ref ?

So for a different sample, I mesure the reflectance (R_sample_meas) and the acutal reflectance curve is R_sample_true = R_sample_meas * R_Al_ref

Is this the correct approach?

$\endgroup$

1 Answer 1

0
$\begingroup$

"Homemade" reference measurements may be tricky and will entirely depend on what your instrument measures.

The main instrument I use is the Lambda 1050 UV/Vis/NIR Spectrophotometer which makes a reference run with a white target of known reflectivity prior to any measurement.

https://www.perkinelmer.com/product/lambda-1050-2d-base-inst-no-sw-l6020055

This measurement essentially gives a known value measured by the spectrophotometer in order to have a 0-100% dynamic range. Otherwise, if the reference measurement is not run, you run the risk of measuring transmittance or reflectance of >100% (which for most real materials is not possible).

So the actual reflectance curve of Aluminium is R_Al_true = R_Al_meas * R_Al_ref ?

Not strictly necessarily, unless the instruments with which both measurements are made are exactly the same (which is never the case).

If the only reference you have is the aluminum mirror it should be fine for some wavelengths, but in general a calibration run should be done with a white reflectance target, such as this:

https://www.edmundoptics.com/f/white-balance-reflectance-targets/13169/

(This is on the expensive side, your spectrophotometer may also have its own white diffuse reflectance target):

Here you can see the reflectance spectrum for a relatively inexpensive aluminum mirror: Thorlabs alu mirror
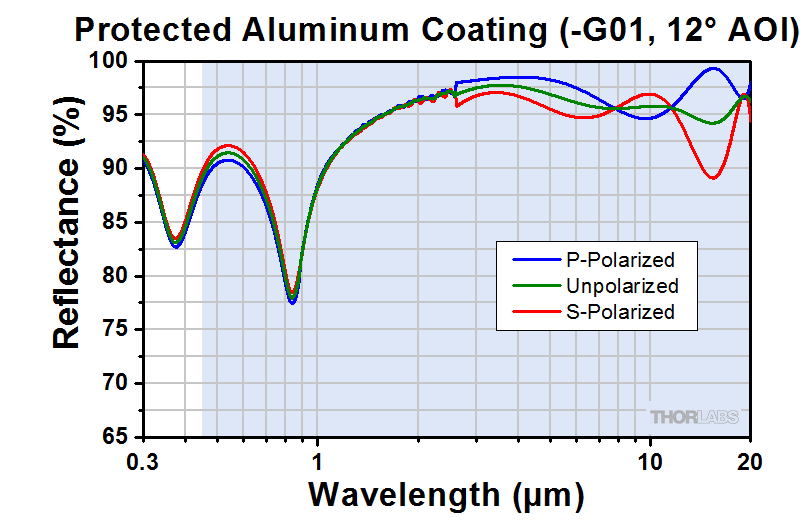
I think that maybe if you multiply the reflectance spectra you would have a time-domain convolution which may not be necessarily what you are trying to achieve here, since the reflectance spectra multiplied by a reference may not be what you are trying to achieve here.

These comments are of course assuming that there is no calibration run in your instrument (which is unlikely but it could be the case). In the case where you have no reference of what 100% reflectance is, then it makes sense to calibrate the instrument first, but multiplying a reference spectrum is not something that I would assume would yield a useful measurement.

$\endgroup$
3
  • $\begingroup$ Thank you for your response. Maybe I follow up on some things. Regarding the white target of known reflectivty. Is that suitable to use if my samples are polished and do not have significant diffuse reflections? My samples are mirror like. Regarding a calibration run, my instrument takes a baseline measurement of a reference material (in my case, it is an aluminium mirror). $\endgroup$
    – user668074
    Commented Jul 22 at 23:49
  • $\begingroup$ About the white target: The white diffuse target provides an excellent broadband baseline for T/R measurements but it also depends on the detector that you have. If the reference material is the aluminum mirror, that will give you the baseline R100 (100% reflectance) which would be then the reference (if you get e.g. power values instead of R values). It would really depend on how your spectro handles data $\endgroup$
    – ondas
    Commented Jul 24 at 14:35
  • $\begingroup$ thank you for your comment. My spectrometer seems to be intended for reflective surfaces and reommends a metal surface or aluminium mirror as a reference. Regarding how it handles data, I may have to search the manuals more, so far there is not much information on the processing, mainly tutorial information and instrutions. $\endgroup$
    – user668074
    Commented Jul 29 at 6:39

Your Answer

By clicking “Post Your Answer”, you agree to our terms of service and acknowledge you have read our privacy policy.

Not the answer you're looking for? Browse other questions tagged or ask your own question.